Going-to-the-Sun Road Itinerary For Families
Chances are good that your plan to visit Glacier National Park in Montana will take you along Going-to-the-Sun Road. Some of the park’s biggest highlights are found along this road. If you have just one day, here’s an itinerary for driving Going-to-the-Sun Road. This one-day guide is particularly good for traveling families, since it includes easy hikes and breaks to play in Lake McDonald.
Why is Going-to-the-Sun Road a must-see?
Going-to-the-Sun Road is widely considered as one of the most scenic drives in the U.S. It a 50-mile road cutting across Glacier National Park, raising in elevation as you near the Continental Divide, before lowering again.
Built in the 1920s and 1930s, it’s a marvel to drive with its curvy roads hugging the mountains, tunnels, and a few hairpin turns.
Tip: Driving this road is popular that in 2021, the park started requiring reservations with a dated entry ticket (in addition to the park pass) were required for peak hours. Be sure to check if you need to do that for your visit. It’s only $2 to purchase and it’s good for seven days. Even with the tickets trying to cut back on crowds and traffic, you’ll never feel alone when driving this road.
How long does it take to drive Going-to-the-Sun Road?
This totally depends on you and how much you want to see and do on the road. It’s a 50-mile road and to drive it without stops, you can expect to take about 2 hours. There are portions of this road where you won’t feel very confident driving faster than 25 miles an hour…if even.
I’d recommend allowing a minimum of 4 hours. We left an entire day open just for touring the road.
If you take a tour, you’ll know exactly how long to expect.
- Glacier National Park Private Full-Day Tour from Whitefish (only includes a small portion of Going-to-the-Sun Road)
- Glacier National Park Lodges Red Bus Tours (anywhere from 2.5 hours to 8 hours, various tours cover various spots of Going-to-the-Sun road)
- Sun Tours (full-day and half-day options for Going-to-the-Sun Road)
When is Going-to-the-Sun Road open?
Some portions of the Going-to-the-Sun Road are open year-round while others are weather-dependent. Generally, though, the road is fully open starting in late June or July. Depending on the weather, portions close typically on the third Monday in October.
Fun fact: In the spring, portions of Going-to-the-Sun Road are closed to vehicles and open for biking!
Going-to-the-Sun Road itinerary & favorite stops for families
It’s highly recommended that you start your day on Going-to-the-Sun Road as early as possible. When guidebooks say the parking lot at Logan Pass fill up by 8 a.m., they aren’t overselling it. So, start early.
This itinerary is a round trip route starting from the West Glacier entrance and driving east. If you enter through the St. Mary entrance on the east side, then, just flip this route around.
Tip: Give your kids a book like “National Geographic Kids National Parks Guide USA Centennial Edition” so they can help plan stops they’d like to see on this trip!
Stop 1 – Logan Pass
It’s tempting to stop along the way, and I won’t hold it against you if you do. I planned our route to go to the Logan Pass stop first for a couple of reasons – we were going to do a longish hike there; I knew parking was going to be a pain at Logan Pass; and I was leaving some stuff tp see for our drive back. But, if you wish you can stop wherever you want.
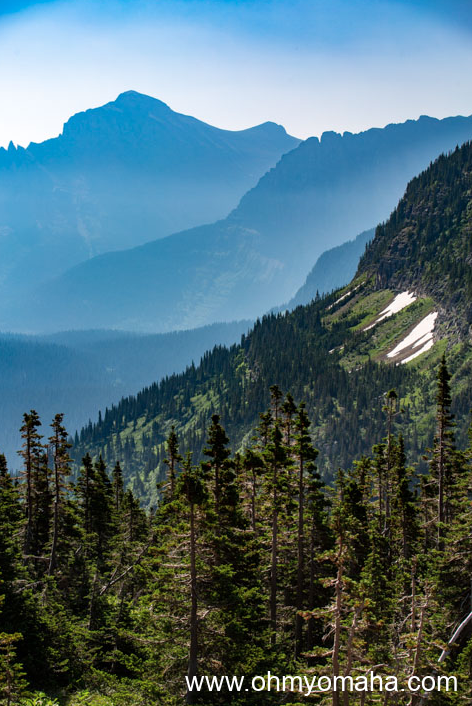
You’ll drive several pull-outs to take in views. On this drive to Logan Pass, you’ll drive pass the hairpin turn The Loop. You can stop here, if you wish.
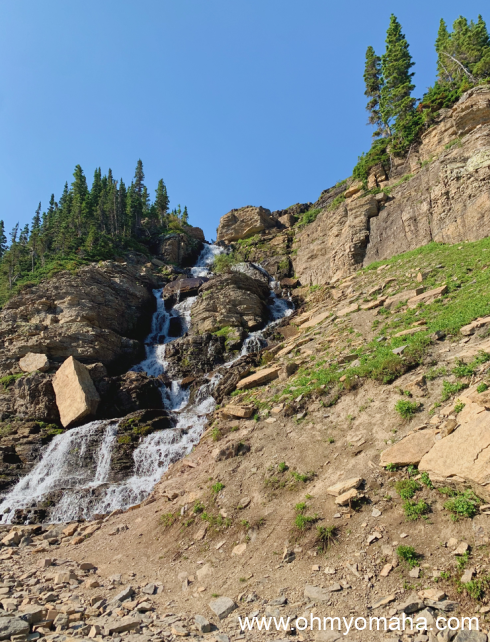
Onward you go, past the Weeping Wall, where water pours down in the spring and summer (driving east to west, you’ll want your windows rolled up – trust me on this one). There are several rock walls dripping water but this one’s quite a sight. There’s a pullout to stop at to the east of the wall if you want to stop and take pictures.
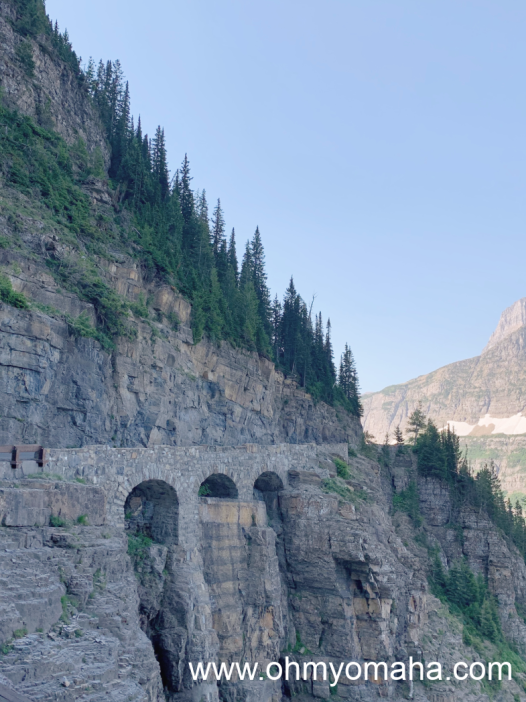
Continuing west, you’ll see Triple Arches (you won’t see this if you’re driving east to west since you’ll be driving over it first). It’s an impressive feat of engineering.
Tip: On this route, you’re rising in elevation and it was handy having gum on hand for kids’ popping ears.
Finally, you’ll start seeing signs for Logan Pass. If there’s a parking spot at the lot just about a half-mile from Logan Pass, take it. You can try your luck at Logan Pass but unless it’s before 8 a.m., you’ll find yourself circling that lot like it was Black Friday morning.
Logan Pass is the starting point for two popular hikes – Hidden Lake Overlook and Highline – as well as the location of the Continental Divide. For young children or those with limited mobility, skip both hikes and walk the paved Logan Pass Trail, an interpretive trail with signs and hand-crank audio stations. You’ll likely encounter pushy ground squirrels.
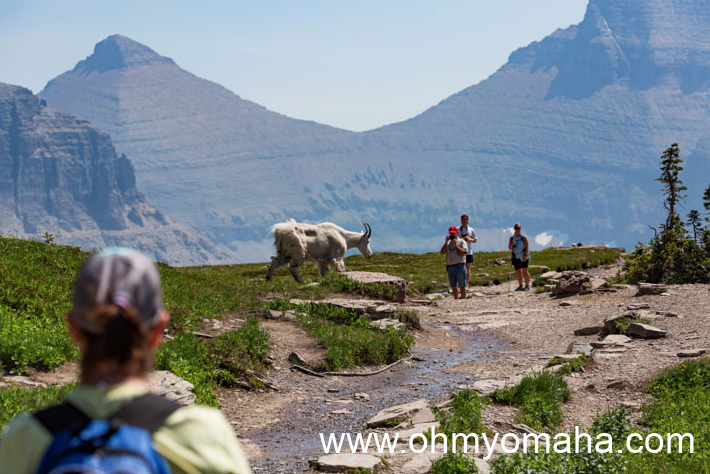
We were lucky and also saw a wandering mountain goat by the visitor center!
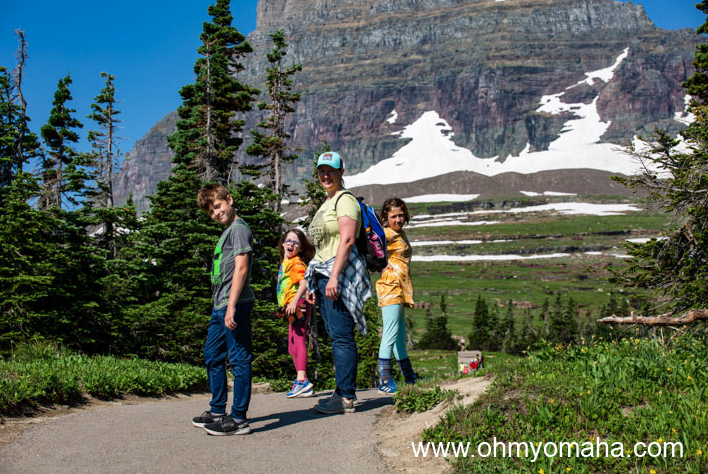
If you’re prepared, I recommend hiking the Hidden Lake Overlook Trail. It’s one of the shorter trails in the park with a big payoff. It’s tough, for sure, so bring water, wear sturdy hiking shoes, and consider hiking poles for the snow-covered parts of the trail. It’s 100% worth the effort.
The trail is 2.6 miles round trip and it can be longer if the trail down to the lake is open. But for families, It’s the right length and just difficult enough to make hiking it feel like an accomplishment.
The start of the trail is wooden steps and walkways. In early July, wildflowers dot the fields on both sides. There are 30 rare plants and fauna at Logan Pass, so be on the lookout.
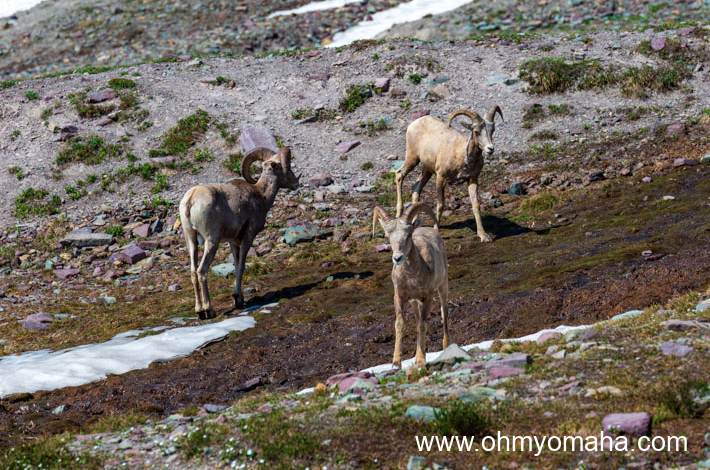
The stairs are the toughest part, so take your time and rest when you need to. Look toward the rocky mountainside for big horn sheep and mountain goats.
Once the stairs are over, you hit a dirt path and, likely, some snow. In July, the snow is melting and if you aren’t careful, you’ll step though some of the deeper parts and fill your shoes!
It’s at this point we encountered three bighorn sheep awfully close to the trail. While incredible to be see so close, it was also scary so we kept our distance until they continued on their way. Half of our hiking group turned back at this point, having gotten enough of wildlife for the day. My husband and I continued on, and the trail got easier.
You’ll cross a small bridge, rocky moments on the trail, clear mountain lakes, and more meadows before reaching the overlook. The view was marvelous. We were lucky enough to be gathered at the ledge with an eagle-eye park ranger who pointed out a sow grizzly bear and her two cubs splashing in the lake below. We needed binoculars to see them, so they weren’t super close and no danger to us.
What was super close was a herd of mountain goats, complete with a couple fluffy white kids. I highly recommend finding a park ranger to chat with because we learned this random fact; Since mountain goats are deficient of electrolytes, they hang around humans and wait for us to urinate so they can come down and lick it up. This is the kind of facts to keep in your pocket to impress your kids.
Tip: Mountain goats are easy to shoo off. Just clap your hands a few times.
We had packed a picnic for the day, so after our hike, we enjoyed in the shade of the visitor center building.
Stop 2 – Jackson Glacier Overlook
We came to Glacier National Park to see one of the park’s namesakes, which are all receding at alarming rates. For your best view of a glacier while on Going-to-the-Sun Road, park at the Jackson Glacier Overlook.
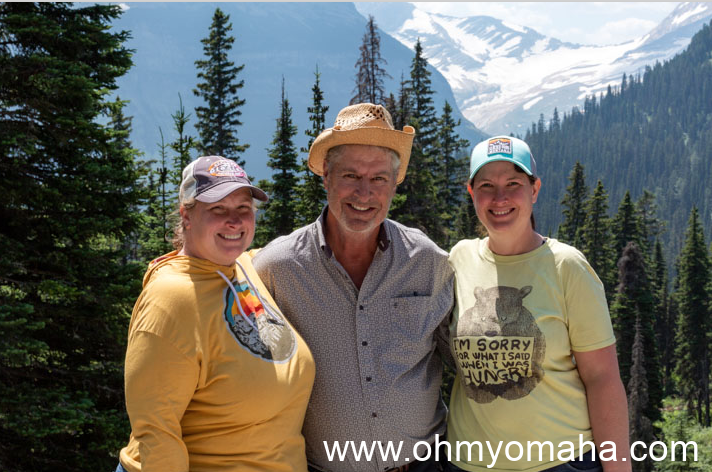
Ambitious folk may want to hike a bit here, but my family was done with hikes for the time being. It was a good backdrop, however, for a family photo. So I took one with my sister and dad.
Having driven past this point, I can honestly say it’d be understandable if you want to turn around at this point and start driving back. The next stop, while providing a very Instagrammable photo opportunity, wasn’t one of the day’s highlights.
Stop 3 – Wild Goose Island Overlook
The next part of your drive travels through terrain that has been burned by a massive wildfire. There has been some regrowth but it’s still a startling sight.
You’ll start to see St. Mary Lake, the park’s second largest lake. It’s a beautifully clear mountain lake with a teeny tiny island in it. That is Wild Goose Island.
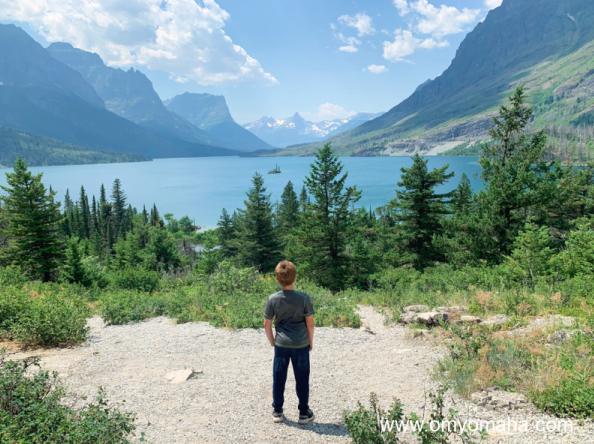
There’s a small parking lot near an overlook for the island. With the clear lake and the looming mountains in the background, it’s a pretty sight, for sure.
At this point, the completists will want to keep driving Going-to-the-Sun Road until reading the St. Mary Visitor Center. It’s not very far from the overlook.
However, I’m not a completist and I was ready to turn around and start our trek back toward West Glacier.
Stop 4 – Avalanche and Trail of the Cedars
The drive back is a little less harrowing since you’re not driving on the edge of the curvy road. However, you are driving very close to the jagged rock walls, so you’re not totally relaxed.
I planned our next stop to be Avalanche because it’s a long drive west on Going-to-the-Sun Road, allowing everyone to rest up for one more (very easy) hike, the Trail of the Cedars Nature Trail.
Once you reach Avalanche, take the first parking spot you can find. It’s a popular stop near McDonald Creek. It’s tempting to skip this nature trail since it’s only a .9-mile loop, but the lush terrain — unlike anything else we saw in Glacier National Park — is worth the short hike. It’s also highly accessible being a mix of paved and boardwalk trails.
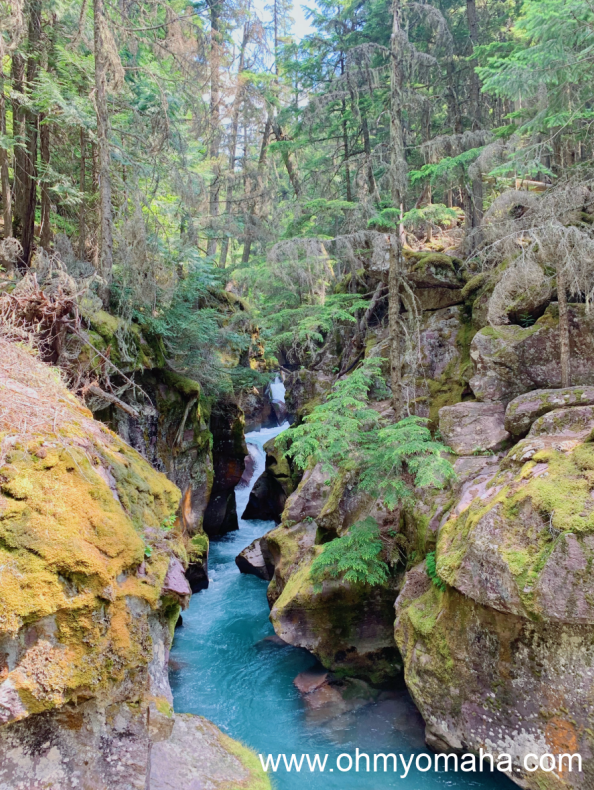
You’ll cross a bridge over a creek, with a beautiful waterfall to the side. Towering Cedars and Black Cottonwoods provide amble shade, which was a welcomed and refreshing change from Hidden Lake Trail.
I’d read it was the easternmost rainforest in the U.S., though when we asked a park ranger about it, she said it’s close to being one because of all the moisture and types of plants thriving there, but it sounded like she didn’t quite designate it as one.
Anyway, this trail is perfect for families with youngsters or just anyone who needs a break from the sun. While we didn’t spot a ton of wildlife since it’s so heavily traveled, it was a tranquil experience.
Stop 5 – Lake McDonald Lodge
If you’re not absolutely exhausted, plan a quick stop at Lake McDonald Lodge. Peek inside to see the stately rustic lobby 1913. Animal heads hang from walls. A grand stone fireplace is off to the side. Look up to admire the unique light fixture.

Make your way behind the lodge for pretty views of Lake McDonald, the largest lake in the park. Kids and the young at heart are going to want to wade into the lake and hop along large rocks. You’ll want to walk up close to the lake too, because the clear waters show the multi-colored rocks that the lake is known for.
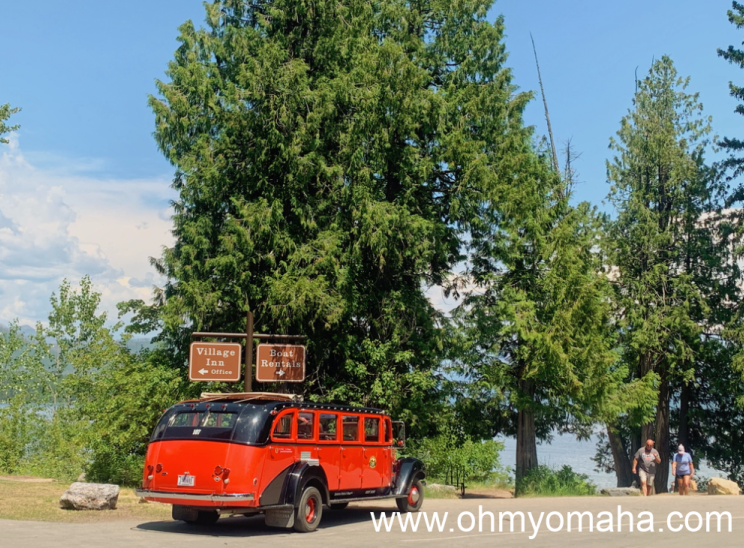
This is a launching point for a boat tour of Lake McDonald. You may be able to snag some tickets if you haven’t made reservations already.
If you’re tired and need refreshments, this is one of the few places on Going-to-the-Sun Road where you can find some food and drinks for purchase. If you’re lucky, you can sit on one of the few wooden rocking chairs overlooking the lake and enjoy your drink. I saw on the menu they serve a huckleberry margarita that sounded pretty interesting.
Stop 6 – Apgar Village
At this point, you’re going to be understandably tired and/or your kids are going to be understandably cranky. You can probably get away with skipping Apgar Village today if you have another day or two planned for Glacier National Park. If this is your only day, plan for a quick stop.
Why? Do it if only for the ice cream at The West Glacier Café and to buy your souvenirs at the nearby gift shop. Just kidding.
(Not really)
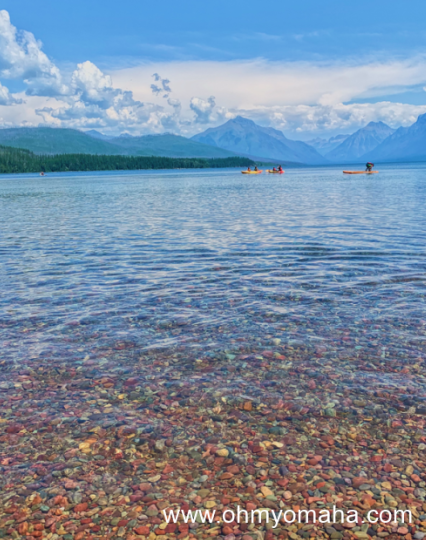
It’s a great stop for a view of Lake McDonald. There’s a good chance that if you’ve seen a picture of Glacier National Park, you’ve seen one of the crystal clear water and colorful rocks found at Lake McDonald.
On a separate day, we rented bikes at Apgar. There are a few miles of paved trails that are easy enough for any skill level. We biked to the iconic entrance sign to Glacier National Park at the West Glacier entrance. It’s not a very long ride, but there is a big of unpaved trail that’s downhill that you’ll need to be careful on along the way.
If you decide to leave the park at this west entrance, there’s a lot to see and do in the area!